Showing posts with label NAILS. Show all posts

Wednesday, February 27, 2013

Top coat review

hey girls, how have you been? I did a little experiment a few days ago and wanted to tell you all about it...i have a BIG problem keeping my nail polish intact for more than a few hours so i wanted to test all the top coat that i have accumulated over the past years....so here is what i found:
 
Salut les filles, comment allez-vous? J'ai fais une petite expérience il y a quelques jours et je voulais vous en parler...j'ai un BEAUCOUP de difficultés à garder mon vernis à ongles en bon état pour plus que quelques heures, alors j'ai décidé de tester tous les top coat que j'ai accumulé dans les dernières années, voici mon résumé:

 
REVLON No Chip Top Coat:
What I Think: Even thought it's pretty inexpensive, i was expecting more, it did not even make it trough the night...
How long it stayed: Not even one night
Overral note: 1/5


SEPHORA BY OPI Quick Dry Top Coat
What I Think: It's definitely not the worst but it's not my favorite either. After a while (when the bottle gets half empty) it gets sticky and the texture is not easy to apply.
How long it stayed: There was a chip on the second night.
Overral note: 3/5


REVLON COLORSTAY Base Coat
What I Think: I was really hopeful about this new line because it was supposed to be gel-like, i'm not totally impressed with this base coat, it's not my favorite.
How long it stayed:  It really chipped on the third night.
Overral note: 3.5/5


Sally Hansen Insta-Dri Top Coat
What I Think: I was not expecting a lot from this inexpensive top coat but i was really impressed with it!
How long it stayed: Intact on the third night
Overral note: 4/5
 

QUO BY ORLY Gels Top Coat
What I Think: I did not realize that i needed a lamp to use this top coat, so it did not work at all.
How long it stayed: could not tell...
Overral note: -/5
 

NICOLE BY OPI top coat
What I Think: I'm really not a fan of this line by OPI. For almost the same price, the quality is not good at all...
How long it stayed: Ruined on the second night
Overral note: 2/5
 

ESSIE No Chips Ahead Top Coat
What I Think: I don't know why, but i thought i did not like this top coat at all but it turned out better than others
How long it stayed: It chipped on the second night
Overral note: 2.5/5
 

GOSH Top Coat
What I Think: I really like the texture of this top coat but it did not stayed as long as i thought.
How long it stayed: Chip on the second night
Overral note: 3/5
 

L'Oréal Base Coat
What I Think: This is my favorite base coat, it is easy to apply and it dries really fast.
How long it stayed: did not do well without a top coat but great base
Overral note: 4/5
 

SALLY HANSEN MEGA SHINE Top Coat
What I Think: I did not acknowledge a special kind of shine
How long it stayed: Little chip on the second night
Overral note: 2/5
 

SECHE VITE Top Coat
What I Think: This seemed to be the best top coat on the market (according to all the nail polish addicts) but i was a little bit disapointed, it REALLY dries fast (which i adore) but it does not stay on for a long time..
How long it stayed: Usually chips the second or third day 
Overral note: 4/5
 

Monday, June 11, 2012

Nail Art: Summery Leopard Print

 Just a little bit of leopard print or a whole lot of it?


Friday, June 8, 2012

Nail Idea: Ombre

Hey guys! How have you been? I hope you're enjoying your spring so far, summer is coming up so fast, i love it!!! Today, i have a little nail tutorial that i found here from a youtube fashion/makeup guru and i wanted to try it myself! I did the first try in blue fading to neon green and the second one is lilac fading to purple. This tutorial is really simple. I chose to do mine with only 2 colors because i think it is prettier but you can totally do 3 colors. Here are the steps:
1- Apply a base coat
2- Paint your nails white so that the colors will pop against the white polish
3- Wait for the white to be compeletely dry and then use a makeup sponge and paint the tip with your colors by stripes (go check the video out for help)
4- Apply the sponge very softly on your nail
5- Repeat the steps 3 and 4 for each nail or for every 2-3 nails if you want a softer look
6- Let it dry and apply your favorite top coat
And here is the results!


Tuesday, April 3, 2012

Metallic nails


1st look: OPI silver shatter over pink polish
2nd look: Purple and Foil, inspired by http://thebeautydepartment.com/2012/03/nailed-it-4/

Wednesday, February 22, 2012

Nail Tutorial: Black & Red

Hey guys, i did a Valentine's day nail tutorial a couple of days ago and i did the same with different colors, i just wanted to show you guys the result!

Tuesday, February 14, 2012

Valentine's Day: Nail Tutorial


Paint your nails with your first color and let them dry completely (really important!!!). Then, take a Scotch Tape and put it either on the end of your nails or at the base (depending on what you want the triangles to look like). Then, paint the rest of your nails with another color. Let it dry for a little bit and take off the tape, you will then have some cool triangles on your nails. Don't forget to put a top coat to protect your design.
For my nails, i used 2 pastel colors, since i'm really into pastels, the pink is by NYC and is called Lincoln Square Lavender and the purple is a random polish.


Saturday, February 4, 2012

Nails Of the Week: Peter Pan Collar

Hey guys, how have you been? I've been good but pretty busy, i'm still tryin to find more time to take pictures for my blog! My friend showed me this nails idea from The Beauty Department and i wanted to try it out. I gotta admit it, it was pretty difficult, i only did one hand and it was long. I'm going to try it out  again soon, maybe the result will be better. here it is!

The inspiration from: http://thebeautydepartment.com/2012/01/mani-monday-2/#more-5310


My version


Sunday, January 22, 2012

Nails of the Week: Set in Stones


Hey guys, how have you been? My friend got me this new polish from Essie and it is amazing! Thanks K

Thursday, December 29, 2011

Sally Hansen Salon Effects Review

Hey guys, i just got 2 of the new nail polish strips from Sally Hansen Salon Effects. I bought «Hear Me Roar» and my friend Anna got «Tri-bal it on». We had fun doing them and they are really easy to use. Of course, you have to prepare you nails for the strips but i used them in the past and they really last. I will probably keep them for a week or so. They are worth it but i wouldn't buy them every week cause i really like to change my nails every 2 to 3 days. Here is some pictures of the sets we got and the final result. Check it out


Nails of the week

Here is some nails i did in florida!!They are pretty summer-ish ! I did my thumbs in a different color, more creamy and i love the mix..


Friday, December 23, 2011

Nails of the week: Glittery

Hey guys, here is some nails that i did before going on vacation. I put a coat of black glittery nail polish from NYC and added some white glitters that my grandmother gave me. The result was really cute and extra sparkly...perfect for the holidays!


Tuesday, December 13, 2011

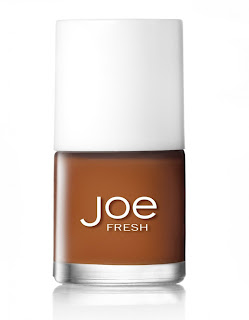
Nails of the Week: Pumpkin

Hey guys, here are my nails of the week: Pumpkin by Joe. They look more orange on camera, (they are a more of a  yellowish-ocher color)...